Sprinkler Valve Wiring Example - Step-by-Step Video Guide
What You'll Learn
- Proper wire connections for sprinkler valves
- Common wire (white) connection technique
- Zone wire (colored) connection method
- How to identify and connect solenoid wires
- Best practices for waterproof connections
Complete Valve Wiring Instructions
Wiring sprinkler valves correctly is essential for a reliable irrigation system. This guide shows you the proper technique for connecting your controller wires to irrigation valves using a real-world example.
Understanding Sprinkler Valve Wiring Basics
Every sprinkler valve has two wires coming from its solenoid (the electromagnetic coil that opens and closes the valve). These wires need to be connected to:
- Common Wire (usually white): This wire is shared by all valves and returns to the controller
- Zone Wire (colored): Each valve gets its own unique zone wire that goes back to a specific terminal on the controller
Tools & Materials Needed
- Wire strippers or wire cutters
- Waterproof wire connectors (grease-filled wire nuts or DBY connectors)
- 18-gauge multi-strand irrigation wire
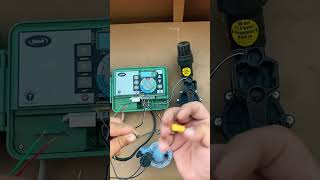
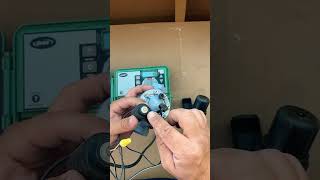
Step 1: Prepare the Wires
Strip about 1/2 inch of insulation from each wire end. Make sure the copper strands are clean and not frayed. Twist the strands tightly together so they form a solid bundle.
Step 2: Connect the Common Wire
Take one wire from the valve solenoid and connect it to the white common wire from your controller. Use a waterproof wire connector (grease-filled wire nut) to join these wires. Make sure the connection is tight and fully inserted into the connector.
Important: The common wire connects to ALL valves in your system. It's like the return path in an electrical circuit.
Step 3: Connect the Zone Wire
Connect the second wire from the valve solenoid to the colored zone wire (red, green, blue, etc.) that corresponds to this valve's zone number on your controller. Again, use a waterproof connector and ensure a tight connection.
Step 4: Secure and Protect
After making the connections, gently tug on each wire to verify it's secure. If using grease-filled connectors, the grease will seal out moisture. You can also wrap connections with electrical tape for extra protection, though it's not required with waterproof connectors.
Pro Tips for Valve Wiring
Tip 1: Always use waterproof (DBY or grease-filled) wire connectors. Regular wire nuts will corrode underground.
Tip 2: Leave some slack in the wires so the valve can be removed for maintenance without cutting wires.
Tip 3: It doesn't matter which solenoid wire connects to common vs zone - valves work either way.
Tip 4: Label your wires! Use numbered tags or different colored wires to identify which valve is which.
Common Wiring Mistakes to Avoid
- Using regular wire nuts: They're not waterproof and will fail underground
- Not stripping enough wire: Connections need good contact; too little stripped wire = weak connection
- Mixing up zone wires: Each zone wire should go to only ONE valve (except for master valve setups)
- Cutting wires too short: Leave enough length to work with for future repairs
- Not testing before burying: Always test the valve operation before covering wire connections
Testing Your Wiring
After wiring, test each valve from your controller:
- Turn on the zone from your controller
- The valve should click and water should flow
- When the zone turns off, the valve should close
- If it doesn't work, check your connections and make sure wires are tight
Helpful Tools & Resources
Frequently Asked Questions
Does it matter which valve wire connects to which controller wire?
No, valves don't have polarity. You can connect either valve wire to the common or zone wire. However, for consistency, most professionals connect one specific wire (like the black wire on Hunter solenoids) to the zone wire.
Can I use regular electrical wire nuts?
No, regular wire nuts are not waterproof and will corrode when buried. Always use irrigation-specific waterproof connectors like DBY connectors or grease-filled wire nuts designed for direct burial.
How many valves can share the same common wire?
All valves in your system share the same common wire. A typical 18-gauge common wire can handle 10-15 valves, depending on wire run length and valve current draw.
What if my valve won't turn on after wiring?
Check these common issues: loose wire connections, wrong terminal on controller, blown fuse in controller, or defective solenoid. Use a multimeter to test for 24V AC at the valve when the zone is activated.
Should I bury the wire connections?
Yes, but use waterproof connectors. Place connections inside the valve box for easy access during troubleshooting and repairs. Never bury connections without a way to access them later.
Want More Sprinkler Tutorials?
Subscribe to our YouTube channel for weekly tips, tricks, and step-by-step guides!
Subscribe Now