
Identifying the Damage
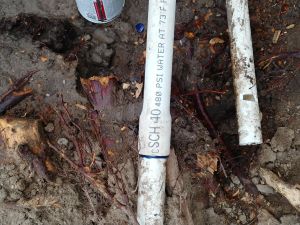
This PVC lateral was accidentally cut by a landscaper during stump removal, resulting in a large hole. Such damage requires immediate attention to prevent water waste and maintain system efficiency.
This PVC lateral was accidentally cut by a landscaper during stump removal, resulting in a large hole. Such damage requires immediate attention to prevent water waste and maintain system efficiency.

Begin by cutting out the damaged section of the PVC pipe. Use appropriate tools to ensure a clean, straight cut for easier repair.

If there's residual water in the PVC pipe lateral, allow it to drain completely before attempting to glue. This ensures a proper bond and effective repair.
Here, I am using the bell end of the PVC pipe to couple the new PVC pipe to the damaged lateral. Other common fittings for these repairs include couplings, slip fixes, compression couplings, or tees (for connecting a swing joint when adding or replacing a sprinkler head).

After gluing one end of the new PVC pipe, cut the opposite end so that it aligns with the existing pipe, leaving a small gap. This gap accommodates the small ridge at the bottom of the new coupling to be installed next.

When gluing this fitting, you'll need to bend the PVC pipe slightly to force the fittings together. If space is limited, consider using a slip fix in conjunction with the coupling for easier installation.

For lateral repairs, primer may not be necessary if your glue is rated for use without primer.

Hold the PVC pipe and fitting together until the glue sets firmly. This ensures a strong, leak-proof connection.

After completing a sprinkler PVC pipe repair, the final result should resemble this. Once the PVC glue has fully dried, it's crucial to test the system. This ensures there are no leaks at the repair site and confirms that the sprinkler system is operating correctly.